Last year my company decided to move from JBoss 4.x/5.x to Jboss AS 7. We use Maven and IZPack plugin to create automated deployment to Jboss 4. As a part of IZPack plugin, we would write the install.xmls for various environment, which would help us deploy war files, log.xml, jars, properties file in respective folders. So the advantage was that Jboss-4 allows you to deploy several xxx-ds.xml files in deploy folder and you can have multiple apps deployed in same Jboss and each app uses it’s respective xxx-ds.xml file.
When we started with Jboss AS 7 we learnt that all datasource setting had to be done in standalone.xml file. **Jboss 7.0 ** got rid of xxx-ds.xml file concept. The problem with this approach was that we could not use IZPack plugin to replace the environment variable if we were deploying multiple apps in the Jboss because every IZPack installation would overwrite the previous standalone.xml setting for datasource section. So our deployment engineer had to manually go and configure each datasource in standalone.xml. God forbid when we have to update expiring passwords for database every few months, then changing all these passwords would have created a havoc.
As a result, we abandoned or let’s say delayed the Jboss4 to Jboss AS 7 upgrade. I was not involved in this first attempt however last week I had some time on hand so I started looking into the issue. It turns out the newer version of Jboss AS 7.1.1-FINAL had re-introduced the concept of deployable datasources.
Let me walk you through 4 ways of configuring the datasources in Jboss AS 7.1.1-FINAL.
**METHOD 1: Standard way. Setting up datasource using standalone.xml(**Not preferred if you have multiple apps in the deployments folder). In this example let’s assume we are using Oracle database.
**Step 1: **Add the Ojdbc14.x.x jar file in the folder
Jboss/modules/com/oracle/jdbc/main
Keep in mind that the folder structure is really important.
Step 2: Create a file module.xml and it along with for jdbc jar file. Add the below xml in the module.xml file.
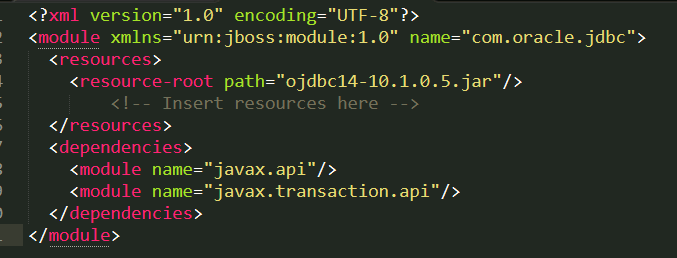
So in the above file, we are defining the location of the jar file in <**resource-root> **tag. You can actually put the jar file in some other folder as well and define the path here but that is not an advisable approach as you will have to provide the full path of the jar file which will cause issues if you have to move the Jboss folder to some other server location.
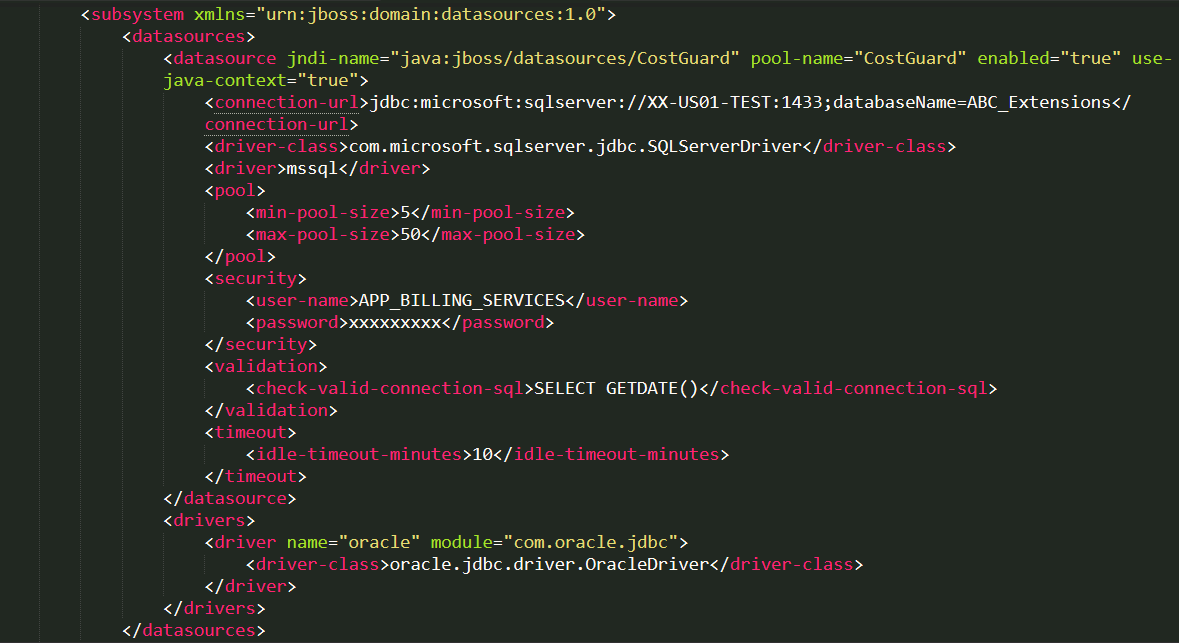
**Step 3: **Open the standalone.xml file under jboss-as-7.1.0.Final\standalone\configuration folder. In the datasources section define datasources. EX:
That’s it. But this is the standard way of adding the datasource. The next time I want to deploy another application in the same Jboss which uses MySQl, I would have to manually update the **standalone.xml **so that I do not change mess up the datasource set up for Oracle.
Method 2: Deploy datasource in stanadalone jar. Assume we are configuring for Oracle datasource.
**Step 1: **Copy ojdbc14.xx.jar in the Jboss/standalone/deployments folder.
cp ojdbc14.10.1.05.jar /usr/jboss-as-7.1.1.Final/standalone/deployments
Step 3: Start the Jboss server to see if the jar file is successfully deployed.
<strong>09:32:10,400 INFO [org.jboss.as.server] (DeploymentScanner-threads - 2) JBAS018559:<br /> Deployed "mysql-connector-java-5.1.18-bin.jar"</strong>
Step 4: Deploy the datasource file
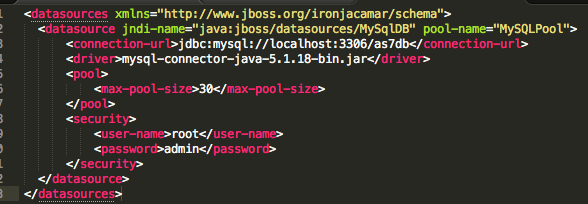
Just fill in an xml file which ends (as we used to do) in -ds.xml, for example this is a oracle-ds.xml which is suitable for Oracle database. ** **
Step 5: Deploy your web app and you are good to go.
At this point you might wonder if there is any pitfall when using the older -ds.xml approach ? well actually if you “bypass” the management interface and deploy the datasource in the old way, you will not be able to manage it through the CLI or Web admin interface. As you can see from this snapshot, our datasource is not enlisted through the manageable resources of the Web interface.
METHOD 3: Deploying the datasource along with your application
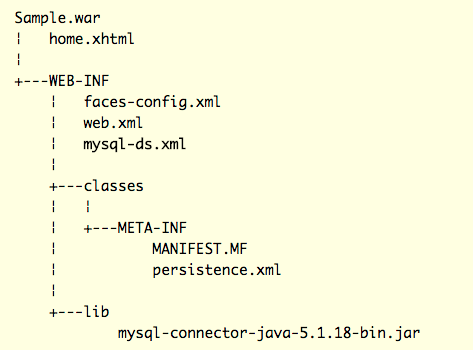
You can actually deploy your datasource along with your application, just you used to do in the past.
Here’s a sample Web application Structure which ships with a datasource (in the WEB-INF folder). For other a JAR archive you would rather need copying the datasource in the META-INF folder:
*Method 4: Hybrid approach using -ds.xml + standalone.xml
I found this approach to be the best because I do not like put jar files inside a WAR applcation which is written in MAVEN. I also do not like to drop JDBC jar files in deployments folder as it I consider it a sacred place for WAR files only. So I figured out a hybrid approach.
**Step 1: **Add the Ojdbc14.x.x jar file in the folder
Jboss/modules/com/oracle/jdbc/main
Keep in mind that the folder structure is really important.
Step 2: Create a file module.xml and it along with for jdbc jar file. Add the below xml in the module.xml file.
So in the above file, we are defining the location of the jar file in <**resource-root> **tag. You can actually put the jar file in some other folder as well and define the path here but that is not an advisable approach as you will have to provide the full path of the jar file which will cause issues if you have to move the Jboss folder to some other server location.
**Step 3: **Open the standalone.xml file under jboss-as-7.1.0.Final\standalone\configuration folder. In the datasources section define datasources. Here you only define the drivers in the datasources section.
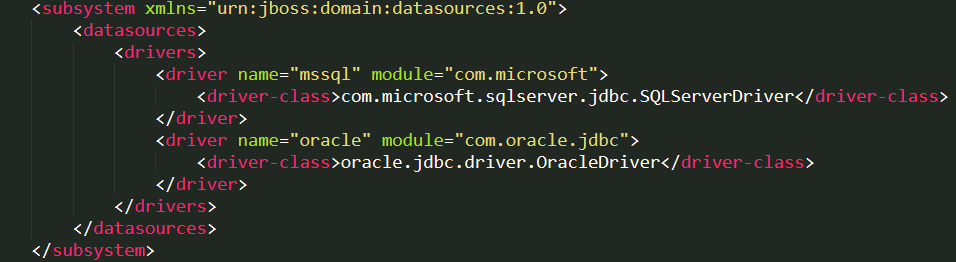
Notice that I have defined 2 drivers and have named them as “mssql” and “oracle“. Also notice the module, this is suppose to be exactly like the folder structure of jar file under **jboss/modules ** section.
**Step 4: **Create a **xx-ds.xml **file and drop it in deployments folder.
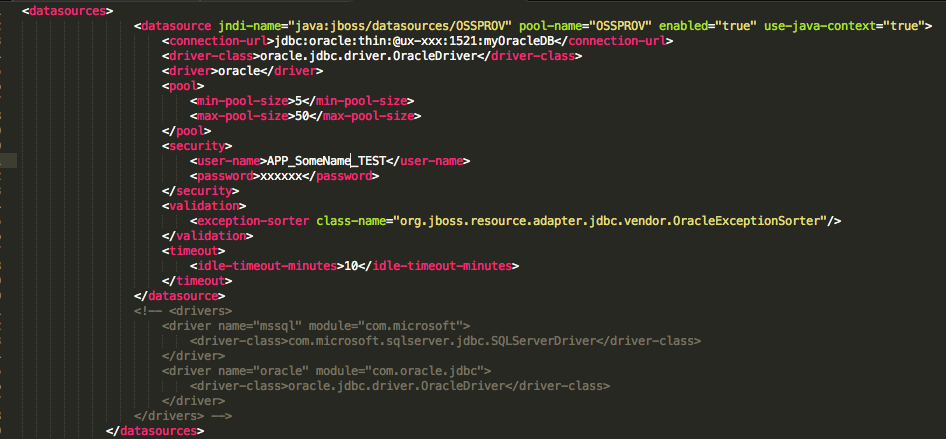
Notice that I have commented out the **
That’s it.
~Ciao